
I’ve loved the look of reclaimed wood for some time now, and decided rather than do a reclaimed wood wall like I had seen in several tutorials online, I would do a reclaimed wood ceiling. Because we have 10-foot ceilings in our study, and I was going for a cozy look, I thought a reclaimed wood ceiling would support a cozy feel for our steampunk home office.
For some reason, however, the wood ceiling tutorials weren’t as common as the wood wall tutorials. I would later discover why that is it.
A Pain in the Neck
The few posts I found online about doing the ceiling sounded as easy as 1, 2, 3. I thought basically we’re doing the same thing on the wall, but we’re doing it on the ceiling! Studs, rafters, it’s all basically the same, right? We should be able to tackle this on a long weekend for sure!
Hubby realized there would be a few differences, but neither of us realized the extent of what we were getting into and how long it would take. That long weekend turned into 4 weekends that felt long (but were never long enough to finish the same weekend).
Staring up the at the ceiling, while on a ladder, while aligning and nailing 9-foot boards? Talk about a crick in your neck! The good news is the relief you will feel during the many trips down the ladder, through the house to trim and retrim your measured ends.
If this sounds like the perfect way to spend every weekend for a month, this tutorial is for you. Keep in mind we are not professionals so the time it took us and our experience may differ from yours. This is a post about how we did our wood ceiling and some of the things we wished we’d been told ahead of time.
With that said, first things first.
DISCLAIMER: DO NOT TRY THIS AT HOME.
Or as my friend calls it, this is a DDIY (Don’t Do It Yourself) tutorial.
Installing a Reclaimed Wood Ceiling
Step 1: Pick Your Materials
What kind of wood will you be using? When I first priced reclaimed wood, my first response was to reclaim my wallet. Because of this, I searched for options that might give the same look with a smaller price. Here are some of the options I researched and some of the pros and cons I considered for each option.
Option 1: Use free pallets
Pros:
- Low cost
- Looks more vintage and rugged than using new wood
- No new trees were chopped down
Cons:
- Time-consuming finding enough free boards to do an entire ceiling
- Time consuming to pull apart the boards if you don’t have a machine
- Health concerns. Could contain chemicals like formaldehyde, which can off-gas into your home and cause respiratory issues
- Shorter boards give a choppy look (wasn’t the look I was going for)
Option 2: Use new pine boards or shiplap boards and stain them to your choosing
Pros:
- Low cost
- You control the color and texture
Cons:
- Time-consuming staining and waiting to dry
- Time consuming to figure out how to achieve the color and look you’re going for
- Health concerns. Oil-based stains contain higher amounts of VOCs than water based stains. Fewer options exist with water-based stains and they tend to not look as good.
This project was big enough, and I didn’t want to spend hours staining in the Texas heat. I wanted something ready to go, which is what lead me to look into the next few options.
Option 3: Use wallpaper than looks like reclaimed wood
Pros:
- Familiar installation
- No nails, no saw
Cons:
- May look fake, especially with lighting coming in at an angle or with the repetitive pattern
- Need a smooth surface to adhere it to
- Can be a pain to remove
Option 4: Use Stikwood
Pros:
- Easy installation
- Looks natural
Cons:
- Pricier than new wood
- Comes in smaller pieces so might give a more “choppy” look
- Could be a pain to remove because it sticks with adhesive and drywall would likely require repair.
As you shop around, consider the look you like. I prefer less of a choppy look (lots of small pieces in disjointed colors). Because I knew what I didn’t want, that helped me identify what I do want (longer pieces so we have fewer seams in natural looking colors, some contrast is ok, but don’t want it to be like a checkerboard so that all anyone sees is the ceiling when they walk in).
Option 5: Use pre-stained boards
Pros:
- Saves time from finishing the wood and waiting for it to dry
- You can purchase and take home the same day if they have that many boards in stock
Cons:
- Color and finish options are limited
Having something that was ready to go was a contender with me. I searched and searched online and the ones that came the closest to what I wanted were these Rustic shiplap boards.

You can pick the boards you want at the store and purchase them the same day. The tones within the same color varied greatly. Some would be the color I was looking for and some would be extremely dark. I did find several boards that was about the color I was looking for, and we loaded them up.
According to the instructions, you have to let the wood acclimate to your temperature and humidity in your home before installing them. We let them sit for a couple of weeks.
During that time, I began to question if it would achieve the steampunk look I was going for, or if it would look like 1970’s wood paneling. We decided it wasn’t what we had envisioned.
I went online and searched again. And I came back to where I started: real reclaimed wood.
Option 6: Use Kiln-Dried Reclaimed Wood
Pros:
- No refinishing needed—looks naturally aged
- Doesn’t require cutting down more trees
- Can come in longer pieces so you don’t get a choppy look
Cons:
- Pricier than new wood, but paying with cash with a local business can save money
If you go this route, use wood that has been kiln-dried so any bugs in the wood don’t stay in the wood. You don’t want termites or other pests in your house!
We chose reclaimed wood in Industrial Pine, which was kiln-dried and finished with a natural water-based sealer.
Here are a couple of things to keep in mind when choosing your material:
- Consistent thickness of boards, otherwise the side edge of the boards will show
- Consistent width of boards, otherwise you’ll have gaps between boards and it will be harder to keep the boards in a straight line.

Step 2: Pick Your Installation Method
Regardless of the type of wood you use, the wood needs to be held by something other than a nail into drywall. Otherwise, the weight of the wood will be pulling on the drywall, or worse, pulling out of the drywall and onto your head.
There are a couple of options on how to support the wood.
Option 1: Use nails and contact adhesive
Pros:
- Flexibility in where you nail and cut the boards
Cons:
- Drywall damage when gluing. If you decide to take it down, you will likely need to replace the drywall or at the very least retexture.
- Health concern with adhesive: Many adhesives contain VOCs.
Option 2: Mark rafters on the ceiling and nail every board into a rafter
Pros:
- No need for adhesive
Cons:
- Time-consuming and challenging installing wood planks: You need to know where the rafters are while you have the board up and every board needs to be nailed into a rafter in at least 2 places.
- More waste, which ultimately costs more. It may be difficult to nail smaller pieces into rafters because many rafters are at least 24 inches apart.
Install wood planks perpendicular to the rafter so that all boards can be nailed into the rafters.
Option 3: Screw plywood into the ceiling rafters and nail your chosen wood into the plywood
Pros:
- Easier installation of wood planks because you don’t have to think about where the rafters are
Cons:
- Time consuming in that you have to install large plywood into the ceiling rafters. You’re covering an entire surface twice
- Adds a slight thickness to the ceiling, depending on how thick your plywood is.
If you have boards without tongue-in-groove or shiplap, you can paint the plywood a dark color which will also hide the spaces between the boards or any knots that may show through. If you’re concerned about VOCs in plywood, there are no-VOC plywood boards available.
This is the route we decided to go with after talking to the owner of the company where we got our reclaimed wood. This is the route we will use for all the next steps in how we installed our reclaimed wood ceiling.
Step 3: Mark Your Rafters
Mark the location of your rafters using a stud finder and mark the ceiling with chalk.

You can watch a time-lapse video here:
Step 4: Purchase Your Materials for Installing Wood Planks Using a Plywood Underlay
Here are the materials we needed for our 12’ x 10’ -ish room:
- Wood planks for about 120 sq. ft plus about 10% extra for scraps= 130 sq. ft.
- Plywood to cover 120 sq. ft
- 1-1/4 “ Brad nails
- #6 x 1-5/8-in Bugle-head coarse thread drywall screws
- Brad nail gun
- Miter saw, jig saw, and circular saw
- Safety goggles
- Gloves (this is important! I got 3 splinters just from moving our wood planks around)
- Drywall lift machine that lifts plywood boards
- Drill and Phillips bit
- Extra set of hands (a suitable helper)
- A pole (nice to have when you have long boards to help lift the other side)
- Ladder
- Measuring tape
- Dark paint (I got ours at the oops counter for a discounted price)
- Hard hat or bike helmet
- Head lamp
- Pencil and paper for measurements
- 2 x 4s for cross bracing 28’ total
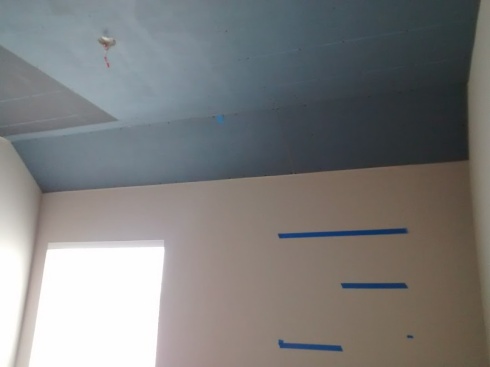
Step 5: Paint the Plywood
Paint the plywood with dark latex paint so that any holes or cracks in the boards don’t show a light color underneath. We had some warped boards so this camouflaged the gaps.

Step 6: Install the Plywood
After the paint dries, screw the plywood into the ceiling. Place the board perpendicular to the marked rafters so that several rafters span the length of the board. Screw through the drywall to the rafters.
Challenges We Faced
Angles
Any angles in the room will require particular attention. We have a mostly rectangular room, but the entry creates a triangular section.
To get a perfect fit with the boards in this angled area, we tried measuring, we tried doing geometry, and we tried tracing on paper. The angled part was just a pain! It will take time and trial and error. If anyone knows of better ways to accomplish cutting for these weird angles, please let me know!
Two Boards, One Rafter
We were in need of a rafter in the last small area of the room, so hubby came up with an idea.
It’s a criss-cross puzzle piece. Two plywood pieces are nailed into one rafter.

Officially In Over Our Heads
We have 10-foot ceilings in the room and we were working with 4’ x 8’ plywood sheets. It was extremely awkward trying to hold such large piece of plywood to the ceiling while he nailed it.
He rigged up this pole contraption where I could lift up one end.
When we tried lifting the first piece of plywood, it ended up sliding off the plywood and came tumbling down over me! Luckily it didn’t hit me, but this was the point I realized we were in over our heads (pun intended!). This was dangerous business!
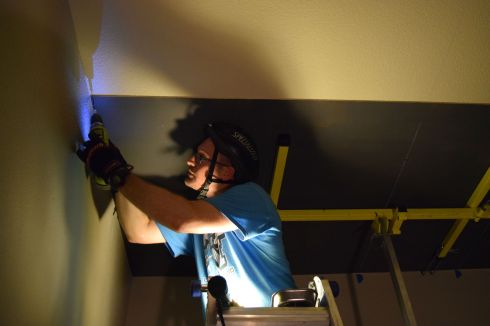
We rented a machine to help us lift the plywood up to where he could screw it in. The instructions for the lifter mentioned wearing a hard hat, so we put our bike helmets on. This is definitely not as easy as 1, 2, 3.

A Step We Weren’t Expecting
While we were installing the plywood, I noticed the instructions for the plywood mention not to use drywall screws, which is what we were using. I called the company to ask if that pertained to us since we were installing it inside over drywall. They said it was OK in our circumstance to use the drywall screws, but they were concerned if the boards will be properly supported since we were using such thin plywood. They suggested to either use glue to help hold the boards up or to add support in between the rafters. Since we had already installed some of the plywood, we spent the next weekend adding support between the rafters.
Step 7: Support the Rafters
We needed support in between the rafters so that over time the boards don’t sag due to gravity. This was the most grueling, frustrating part. It took us an entire weekend just for this part.
What that meant was placing 2 x 4s between each of the rafters about every 24 inches, and screwing the plywood into those supports. It also meant going into the attic to place the supports. It just so happens that the room is on the complete opposite side of the house from the attic opening.
Of course.
September was hotter than many of the days we had in August this year, so by noon, the attic became unbearable. One more reason why this project took so long!
If you’re crazy enough you’ve made it this far, here’s what you do:
- Carry a pencil with you into the attic (no, it’s not to poke your eyes out).
- Remove the attic insulation.
- Measure the spaces between the boards.
You will likely find that the measurements between the same boards will vary depending on which side of the boards you’re measuring. Keep this in mind when you cut the 2 x4 s and come back up to screw them in. Try until you find the place where they fit. - Cut the boards according to your measurements.
- Screw the supports into the rafters.

Isn’t this fun? Try not to think about what everyone else is doing.

An Inspirational Moment

Keep going! You can do it! Now is not the time to give up! If you do, and you lay there, you will likely die of dehydration and heat exhaustion. Let that be the motivation that keeps you going.
After all the supports are screwed in, place the insulation back in place. If you have the pink kind of insulation like we do, you may look like the Energizer bunny at this point, but you will likely not feel energized at all.
If you make it out alive and the job is done, congratulations! You may now move on to the next step.
Step 8: Screw the Plywood (into Supports)!
Using your stud finder, screw the plywood into the supports you placed between the rafters.
Now it’s time for the step you’ve been waiting for: installing those blasted wood planks!
Step 9: Installing Those Blasted Wood Planks
By the time you reach this point, you may be thinking that the look you’re going for is really the painted plywood. I remember thinking, “Couldn’t we just stop here? Those screws look awfully steampunk! It could work!”
But don’t give up yet! The hard part is over and now comes the fun, creative part: nailing the boards into the plywood ceiling. You can think about how you want to arrange the board color and textures.
The hardest part of this step is measuring to get an exact fit with the wall and making sure the boards are level.
Our ceiling slopes down so to get it flush against the wall, we started with the bottom and he cut the back of the board at an angle.
Things to Consider for Board Placement
For an appealing look, vary the…
- Placement of your cut ends on the ceiling.
- Distribution of darks, lights, and medium colored boards.
- Distribution of textured boards, like tar-stained boards.
We usually placed 2 boards per row, but occasionally decided to break it up with a 3rd. Our boards were cut pretty straight so we didn’t have a lot of issues there. Some of the boards were warped so we cut the warped part off and used it as a smaller board somewhere else.
After placing the last board, we sighed with relief.


Have you ever done a wood ceiling? If so, let me know in the comments about your first experience or anything you learned along the way. If not, what was a DIY project that you thought should be a DDIY (Don’t Do It Yourself)?
Check out our steampunk-inspired home office reveal!

Oh. My. Goodness! Definitely a DDIY project. Did you cry?! I totally would have cried starting 1/2 way through the plywood application. Your ceiling looks great, though!!
LikeLike
I was crying on the inside…lol. We were already in the thick of it, so all we could do is keep going! We learned a lot, though! Hopefully this post gives others an accurate picture to decide whether they want to do it themselves. 😉
LikeLike